Japandi Trend Redefining Modern Front Yard Style
A front yard that conveys calm without emptiness, balance without rigidity, and beauty without excess often embodies the Japandi style. This approach merges Japanese minimalism with Scandinavian coziness, emphasizing simplicity, natural respect, and durable craftsmanship. Homeowners increasingly seek this aesthetic for its serene appeal, yet many struggle to implement it effectively in their own spaces.
Translating Japandi principles into a practical front yard requires careful planning to harmonize restraint and warmth. Professional designs appear seamless, but success depends on precise choices in layout, materials, and execution. This guide outlines the core philosophy, necessary tools, and detailed steps to create an inviting outdoor area that enhances your home.
Before You Begin: Planning and Preparation
Evaluate Your Yard
- Examine the layout, noting slopes, drainage paths, and sunlight exposure throughout the day.
- Inspect current features like walkways or porches; retain compatible elements such as stone or wood, or plan replacements for incongruent materials like painted concrete.
- Measure precise boundaries and dimensions to guide the placement of paths, plants, and accents.
Consider environmental factors, including soil type and local climate, to select resilient plants and materials that thrive without constant intervention.
Tools and Materials
Gather basic, dependable tools to ensure efficient work. Focus on quality to avoid frustration during installation.
Essential tools:
- Flat-edged shovel for soil leveling and edge definition
- Wide rake for distributing gravel or sand evenly
- Retractable measuring tape for precise measurements
- Sturdy hand trowel for small-scale planting and adjustments
- Durable wheelbarrow for transporting heavy loads like stones
- Sharp garden shears for clean trimming of plants
Recommended materials:
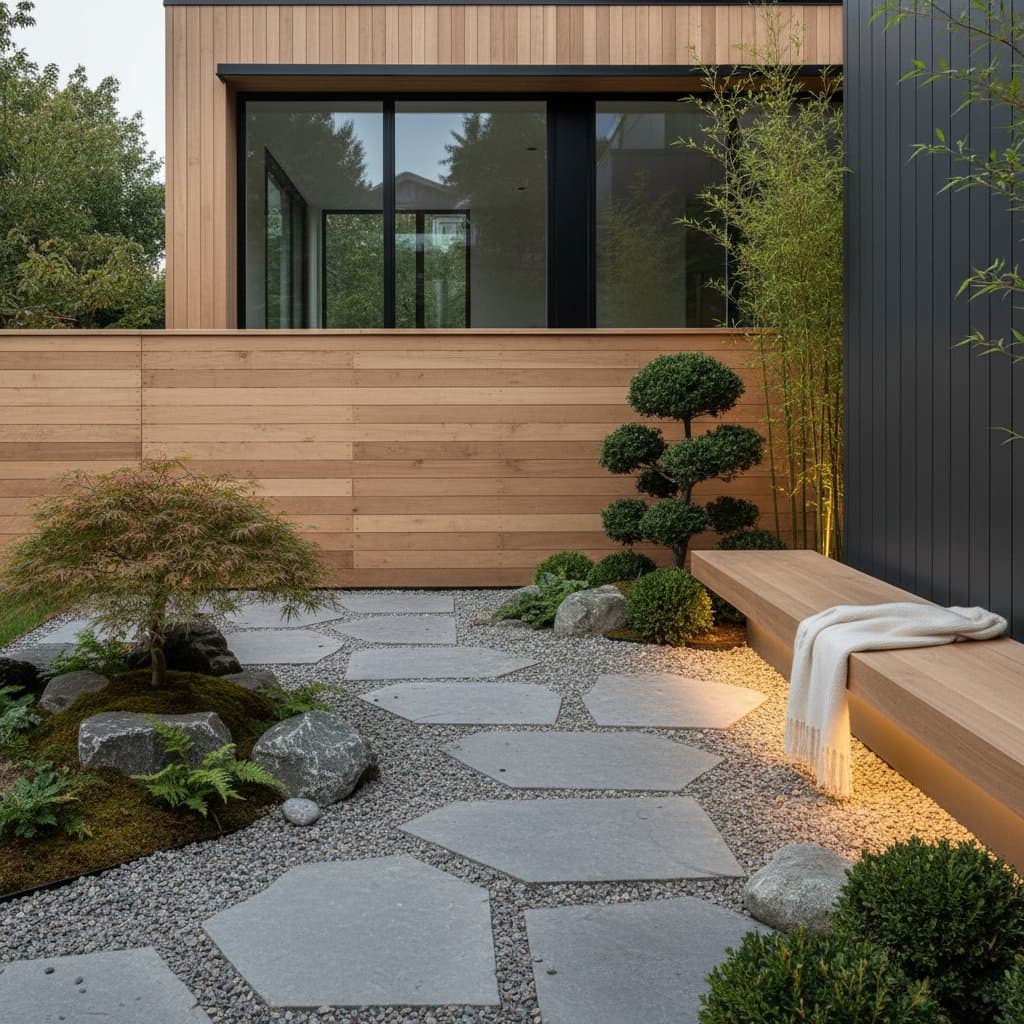
- Fine crushed granite or pea gravel for permeable pathways
- Weathered natural stone pavers or irregular stepping stones
- Untreated bamboo or reclaimed wood for subtle fencing
- Compact evergreen shrubs like boxwood or ornamental grasses such as fountain grass
- Energy-efficient low-voltage LED lights for soft illumination
- Matte-finish ceramic or terracotta planters in neutral tones
These selections promote longevity and align with the style's emphasis on natural textures.
Skill Level and Time Commitment
A typical front yard transformation suits intermediate DIY enthusiasts with some gardening experience. Allocate two to four weekends for completion, accounting for tasks like soil preparation and stone arrangement. Physical demands include lifting materials up to 50 pounds and kneeling for extended periods. Beginners may benefit from professional assistance on initial site preparation to prevent errors in grading or drainage.
Step-by-Step Process for Building Your Japandi Front Yard
Follow these steps methodically to achieve a cohesive design. Each phase builds on the previous, ensuring structural integrity and visual harmony.
Step 1: Clear and Define the Space
Remove all debris, including weeds, overgrown plants, and ornamental clutter that disrupts minimalism. Use a shovel to strip away old mulch layers, then till the soil lightly to aerate it. Establish a subtle slope of one inch per foot away from the foundation to direct water runoff effectively.
Test soil compaction with your foot; add sand if the ground feels too clay-heavy for drainage. This preparation prevents future issues like pooling water or uneven settling.
Step 2: Create Pathways
Outline desired paths with flexible garden hose or taut string lines for straight or gently curving routes. Excavate a shallow trench, then compact a base layer of sand or crushed stone for stability. Spread two inches of gravel over this base, compacting it firmly to create a stable surface.
Position stepping stones at intervals of 18 to 24 inches, aligning them with natural walking strides. Surround stones with finer gravel, tamping it down to lock everything in place and minimize weed intrusion.
Step 3: Add Structural Elements
Incorporate fencing or screens after pathways to frame the space without overwhelming it. Opt for horizontal bamboo slats or cedar panels spaced to allow light and air flow. Secure posts in the ground with concrete footings for durability in varying weather.
Apply a clear, non-yellowing sealant to wood elements if desired, preserving the raw grain while protecting against rot. These features provide subtle privacy and define zones without visual clutter.
Step 4: Planting and Ground Cover
Select plants that offer year-round interest with minimal upkeep. Arrange evergreens or grasses in clusters of three or five for an organic feel, spacing them 12 to 18 inches apart to allow maturation. Dig holes twice the width of root balls, amending soil with compost for better establishment.
Introduce ground covers like Irish moss or sedum between stones to create seamless transitions. These low-growing options suppress weeds and add texture, enhancing the yard's tranquil atmosphere.
Step 5: Integrate Water Feature
Choose a modest basin or simple fountain to introduce soothing sound without dominating the design. Excavate a basin about 12 inches deep, lining it with EPDM rubber or a preformed liner for waterproofing. Position a single large boulder nearby to anchor the feature visually.
Connect a small recirculating pump if flow is desired, ensuring it operates quietly. Scale the element to your yard size—under 24 inches wide for small spaces—to maintain proportion and avoid maintenance overload.
Step 6: Lighting and Finishing Touches
Embed low-voltage LED fixtures along pathways and at key plants, using warm-toned bulbs for inviting glow. Bury cables shallowly and connect to a transformer near an outdoor outlet for safety. Test illumination at dusk to confirm even coverage without glare.
Add a single wooden bench crafted from teak or pine, positioned for quiet reflection. These accents complete the space, encouraging mindful enjoyment.
When to Call a Professional
Engage experts for complex terrain, such as slopes exceeding 15 degrees or areas prone to erosion. Landscape professionals handle retaining walls, ensuring compliance with local building codes. For electrical components like pathway lights or water pumps, a licensed electrician prevents hazards and guarantees warranties.
Plumbing needs arise with integrated water systems; certified installers manage permits and inspections. Prioritizing professionals in these areas safeguards your investment and promotes long-term functionality.
Cost and Maintenance Considerations
Cost Range
Budget $500 to $2,000 for a DIY project covering 200 square feet, depending on material quality and site conditions. Gravel and stone remain affordable alternatives to synthetic paving, while plants and lighting account for 40 percent of expenses. Professional services for drainage or hardscaping add $1,000 to $3,000, offering value through precision.
Source materials from local suppliers to reduce transport costs and support sustainable practices. Track expenditures by category to stay within limits.
Maintenance
Sustain the design with routine care that reinforces its serene quality. Rake gravel paths weekly to redistribute and remove debris. Prune shrubs and grasses biannually in spring and fall, focusing on shape without over-thinning.
Inspect water features monthly, scrubbing surfaces to deter algae and refilling as evaporation occurs. Refresh ground covers annually by patching bare spots with fresh starts. These practices demand minimal time—about one hour weekly—while preserving the yard's understated elegance.
Extending Japandi Principles
Apply these techniques beyond the front yard to unify your outdoor areas. Transform backyards with similar gravel zones and plant groupings, or adapt balconies using potted grasses and stone accents. The philosophy encourages viewing space as a canvas for intentional shaping rather than filling.
For novices, this project hones skills in site analysis, material selection, and aesthetic balance. Future endeavors, such as patio redesigns or indoor extensions, draw directly from these experiences, fostering a cohesive living environment.
Embracing the Evolving Garden
Japandi front yards mature with grace, as patina on wood and established plants add depth over time. Embrace subtle changes like moss spreading or gravel settling as signs of a living space. This enduring design not only beautifies your home but also cultivates daily moments of peace and connection to nature.